How to set up OpenVPN on DD-WRT Routers
This tutorial will show you how to set up OpenVPN on DD-WRT Routers using the SmartyDNS VPN services. If you don’t have a SmartyDNS account, you can try our services for free for 3 days.
Here are the steps you should follow:
Connect to your router. To do that you have to enter the following address in your browser: http://192.168.1.1. Also, if you are connected to your router via Ethernet, set your network connection to obtain the IP address automatically.
Set up your DD-WRT router to share your regular internet connection:
- Go to the “Security” tab (1) and choose “Firewall” (2). Then, set “SPI Firewall” to “Enable” (3).
- Then, at the bottom of this page you will have to set “Log” to “Enable” (4) then set it to “High” (5). Click on “Save” (6) and “Apply Settings” (7).
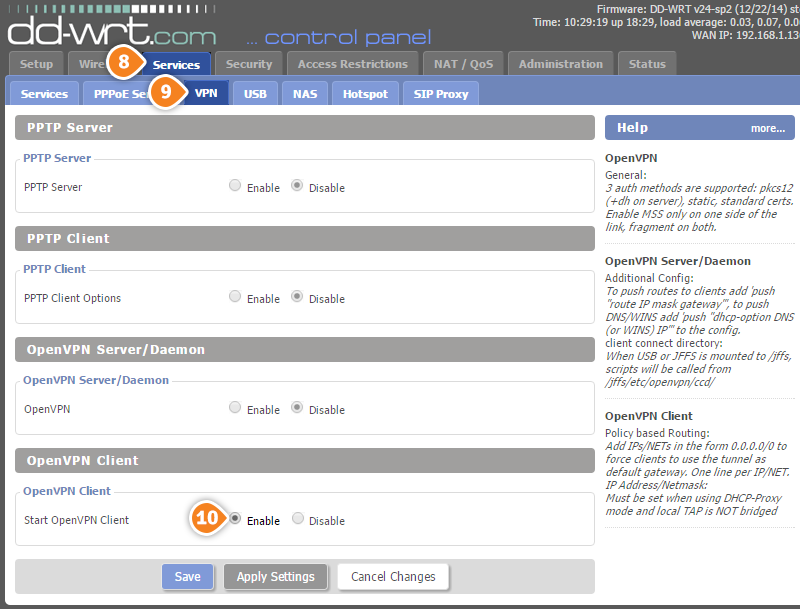
- Now click on “Services” tab (8), then choose “VPN” (9) and set the “OpenVPN Client” to “Enable” (10).
- Then fill the fields and check the radio buttons with the following settings:
Server IP/Name: type the IP address of the SmartyDNS server you want to connect to.
To find the entire list of all available servers, sign in to your account on our website, go to “Setup” -> “VPN Servers“. If you don’t have a SmartyDNS account, you can try our services for free for 3 days.
Port: 443 (or one of these – 1194, 5555, 992)
Tunnel Device: TUN
Tunnel Porotocol: UDP
Encryption Cypher: AES-128-CBC
Hash Algorithm: SHA1
User Pass Authentication: Enable
In the username and password fields type your VPN username and password.
To find your VPN username and password, sign in to your account on our website, go to “Setup” -> “VPN Username & Password“. If you don’t have a SmartyDNS account, you can try our services for free for 3 days.
Advanced options: Enable
TLS Cipher: None
LZO Compression: Disabled
Nat: Enable
Firewall Protection: Enable
- Now complete the “CA Cert”, “Public Client Cert” and “Private Client Cert” fields from the same page. You can find the content for these fields in the OpenVPN config file of the server you want to connect to. To download the config gile, sign in to your account on our website, click on your package, click on the “VPN” tab and click the “Download” link at the right of “OpenVPN config files”.
- Unzip the downloaded file. Edit the OpenVPN config file (with the extension .ovpn) of the server you need to connect to. For instance, if you want to connect to our UK server using the TCP protocol, you have to edit the UK-London-SmartyDNS-TCP.ovpn file (11). You can do that with any text editor such as Notepad.
- Find the lines that begin with “<ca>” (12), “<cert>” (13) and “<key>” (14).
- Copy the text you see inside the <ca> and </ca> tags and paste it to the “Ca Cert” field (15). Then copy the text from <cert> to “Public Client Cert” field (16) and the text from <key> to “Private Client Key” field (17). Once finished click on “Save” (18), then click on “Apply Settings” (19).
- Now go to “Status” tab (20) and choose “OpenVPN” (21). You should see “Client: CONNECTED SUCCESS” message (22). This means the OpenVPN connection on DD-WRT router is created and it is ready to use.