How to set up Smart DNS on Windows 7 and Windows Vista
-
Download the software.
Important! Don’t be alarmed if your anti-virus software identifies our application as a virus. This is a false positive result - just approve it if this happens. This happens because our application is new and some anti-viruses recognize the specific software only after a certain amount of installs. -
Run SmartyDNS Software installation file.
-
Click “Next” (1).
-
Read “License Agreement” then click “I Agree” (2).
-
Click “Next” (3).
-
Click “Install” (4).
-
Once the installation is completed, click “Next” (5).
-
Click “Finish” (6) to launch the SmartyDNS software.
-
Sign in to your Client Area, go to Packages, enter your Package. Go to the “SmartyDNS Key” box (7) and copy the key.
-
Enter your SmartyDNS key (8) and click “Sign in” (9).
-
Click on the “OFF” button (10) to turn on Smart DNS.
You can make the following configurations:
“Choose server” (11) – choose the server that’s closer to you as it may give you better performance. You will be able to access all the officially unblocked websites no matter which server is chosen.
“Update IP every” (12) – if you ISP changes you IP often, you can set up how often our software will automatically update your IP.
You can also set up the software to run at Windows start-up, to enable the Smart DNS service on sign in, to start the software minimized, to sign in at application start and to minimize the software when Smart DNS is enabled.
Click the icon (13) to switch to the Info screen.
Click the icon (14) to switch to the Notifications screen.To sign out, just click on “Sign out” button (15).
Info screen
Here you can:
- Save logs. In case of problems, you can save logs and send them to us. To do that, click the “Save logs” button (16).
- Find out useful information about your package and our services.
Click the “Smart DNS” button (17) to go back to the connection screen.
Notifications screen
Here you can:
- Update to a new version of the software. For that, click the “Update” button (18), if it’s available.
- Be notified if you package is expiring soon. Click the “Mark as read” button (19) to delete the notification.
Click the “Smart DNS” button (20) to go back to the connection screen.
-
Validate your IP Address.
If you have validated your IP address, skip this step and go to the second part of this tutorial (II).
- Sign in to your Client Area.
- Go to “Packages”.
- Choose your package.
-
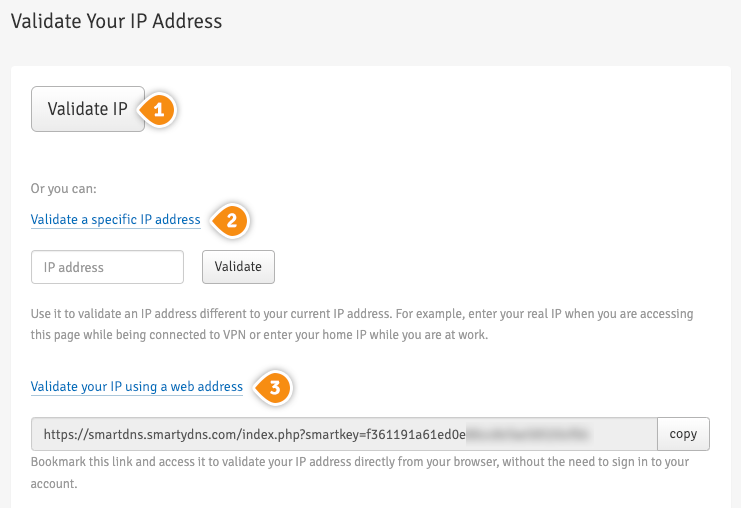
Click the “Validate IP” button (1).
Please go to the second part of this tutorial (II) if you see the “Your IP address has been validated!” message.
Another option is: validate your IP addresses instantly through “Validate IP Link” (2). By choosing this option you don’t have to sign in to your Client Area each time you want to validate the IP address. By adding this link to your browser favorites/bookmarks your IP address will be validated each time you load this URL into your browser.
Keep in mind! If our service is not functioning, please validate your IP address again by following steps 1-4. Your IP address have to be validated every time it changes.Important! It is important to not share the Validate IP Link with anyone! It is particular and unique for every single client. If you give or share it with other people, your Smart DNS service won’t be working.
-
Change your PC DNS server address
This has to be done only once.
Important! Before you switch to our DNS addresses, make sure you write down your current DNS addresses, so you can keep these numbers in case you need to get back to your original settings. If your original configuration were set to “Automatic”, just change your DNS settings back to “Automatic” in order to get back to your original settings.-
Click Start (3) and go to “Control Panel” (4).
-
Go to “View network status and tasks” (5).
-
Click on “Change adapter settings” (6) on the left.
-
If you are connected to the wireless internet, right click on “Wireless Network Connection” (7) then go to “Properties” (8). When using Ethernet/cable connection - right click on “Local Area Connection” (9) then go to “Properties” (8).
-
Select “Internet Protocol Version 4 (TCP/IPv4)” (10) then click “Properties” (11).
-
6. Select the “Use the following DNS server addresses” option (12), enter SmartyDNS DNS addresses (13). You can find them in your Client Area -> Packages -> your package.
-
Click “OK” (14).
-
Restart your computer and you are done.
- Test if the Smart DNS service is configured correctly.
-


